*Annoucements*
Get your entries in for "Look Whooooo's Snapping"

Thursday, January 27, 2011

Photography Tip #5: Capturing your Subject from Different Angles

When you take a picture of someone or something, do you often find yourself standing straight up and looking straight on at your subject/object? It's easy to take a picture from straight on, and sometimes those pictures turn out great. But, what if you were a little more creative the next time you took the picture and squatted down or climbed up high? You might find that just the slightest change in your position and way you angle your camera can have a very dramatic effect on your image.

Here are a few different positions that are worth trying out on your own:

1. Get down on their level (with children or animals for example). This will allow the viewer to see the world from the subject's point-of-view (even if they aren't looking directly into the camera).


2. Take the picture from up high, looking down. This is a very powerful way to capture a child. It really opens up their eyes and creates a beautiful innocence.


3. Capture the details. Zoom in on the little things. These precious little hands and feet will one day no longer be little, so be sure to take the opportunity to save the moment when you can!


Plus, capturing the details allows the viewer to focus on something special, like in the picture below. This couple holding hands during their wedding ceremony shows a beautiful connection of love.


There are so many other angles to utilize when photographing. Don't be afraid to lie on your belly or stand on a ladder. Be as creative as you can. You may end up with some really artistically powerful images.

Wednesday, January 26, 2011

Photography Tip #4: Utilizing Proper Indoor Lighting

This photography tip involves how to utilize proper lighting indoors when photographing. I'll try to keep this as simple as possible as it involves many technical aspects of photography.

1. Quite possibly the most important way of lighting to utilize when photographing indoors is natural light. Open curtains and shades, and if possible, place your subject near a window. (However, do avoid direct harsh sunlight peering in through a window as this will cause harsh shadows).


2. Take advantage of your camera's ability to capture the correct color temperature, therein adjusting for the correct white balance (the setting that adjusts for lighting in order to make white objects appear white). Most cameras give you the option to select from a group of white balance choices, such as Daylight, Cloudy, or Incandescent, which you can choose depending on the light in which you photographing. However, you also have the option of manually setting your white balance. The way you do this is by setting a specific Kelvin temperature (or by measuring color temperatures in degrees). See, all light is not the same. Household light bulbs put out a yellowish light compared to mid-day sunlight, and the light in open shade is bluish compared to mid-day sunlight. The lower the Kelvin temperature, the warmer (yellowish) the light. The higher the Kelvin temperature, the cooler (bluish) the light. Here are a few examples of different lighting scenarios and their corresponding Kelvin temperatures:

* Candle - approx 1200-1500K
* 40 watt incandescent bulb - 2200-2700K
* 200 watt incandescent bulb - 2700-3000K
* Quartz halogen bulb - 3200K
* Direct Sunlight on a clear day (between 10am and 2pm) - 5000K
* Open Shade - 5900K-6500K

Also keep in mind that a custom white balance setting is available, which allows you to take a picture of a white object lit by ambient light and then measures the white balance against it.

The camera used to take the photo to the right was obviously not set to a specific color temperature. Notice how everything in the picture has a yellowish tint to it. This is contributed by the incandescent light bulbs in the room.

3. If you are photographing in low light conditions, take advantage of the use of a tripod. Long exposures require you to hold your camera still to avoid blurring, and a tripod will allow you to do this with much ease.

4. If you have an external flash, take advantage of the ability to bounce flash. Bounce flash is achieved when your flash is facing somewhere other than directly at your subject, perhaps towards the ceiling or the wall to the right or the left. By utilizing bounce flash, you are providing a soft, diffused light for your subject rather than an intense, direct light that would be provided if you had your flash in the forward position (thus, possibly over-exposing your subject). If you find that bounce flash isn't enough light to properly expose your subject, you may want to use your flash in the direct position with the use of a diffuser. Most external flashes have a diffuser built into them. You simply pull it out at the top of your flash, pull it down, and it then covers your flash and provides a softer exposure. However, if your camera doesn't have a custom diffuser, you can use things in your own home that will allow you to cut down on it's intensity (tissue paper and a rubber band for example).

5. You may need to adjust your camera's ISO when photographing indoors. ISO is the measure of the sensitivity of the image sensor to light. The lower the number, the less sensitive your camera is to light and the finer the grain. Higher ISO settings are generally used in darker situations to get faster shutter speeds (that is, if you don't have a tripod handy). However, keep in mind that with higher ISO settings, your image will appear grainer (thus losing detail and introducing unwanted artifacts). My suggestion would be to use a tripod (or a sturdy support) so that you can keep your ISO settings low. I like to keep my ISO around 100 to 400 if possible.

What are some creative ways that have allowed you to overcome adverse lighting conditions indoors?

I hope these suggestions will provide better photos for you next time you decide to photograph indoors. Happy Photographing :)

Friday, January 21, 2011

Photography Tip #3: Capturing Motion

One of the fun and creative aspects about photography is that you have the ability to capture motion in a variety of ways. When planning to take advantage of a motion-filled photographic opportunity, you must first evaluate your shutter speed.


{The above picture was taken with a shutter speed of 1/8000s and an aperture of f/2.0}.

Shutter speed is the unit of measurement that determines how long the shutter remains open when you are taking a photo. The slower the shutter speed, the longer the exposure time. Shutter speed together with aperture controls the total amount of light reaching the sensor. Shutter speed is measured in seconds (or fractions of a second). For example 2, 1, 1/2..... all the way down to 1/8000.  (Aperture is the lens diaphragm opening inside a photographic lens that regulates the amount of light that passes through onto the film inside the camera the moment when the shutter curtain in your camera opens during an exposure process).


{The above picture of two of my brothers playing ball together was taken with a shutter speed of 1/250s and an aperture of f/10.0}.

Using a fast shutter speed allows you to freeze the action of your object in crisp, sharp detail. While, using a slow shutter speed allows you to blur an object or imply motion within a photograph. An important detail to remember is that when using longer shutter speeds a tripod is essential, otherwise you will end up with a blurry picture (from the movement of your hand).

Notice the difference in visual effect within the two pictures below. The top picture was taken with a shutter speed of 1/800s and an aperture of f/5.6 and the bottom picture was taken with a shutter speed of 1/8s at f/36.0.


Useful tips to know when capturing motion in sharp detail:
1. Regardless of what action you're photographing, if the action is coming at you, you can safely shoot at 1/250 sec.
2. If you are attempting to freeze action coming in from the right or left, or if the action you are shooting is moving up and down, for the most part, 1/500 sec is more than sufficient. (However, if the action is very fast, then your best option is 1/1000 sec).

Another creative way to play around with your shutter speed is to utilize the technique known as "panning." When you pan any moving subject, you will almost always be shooting from a point of view that is directly parallel to your subject. When your subject moves into the frame from right or left, simply follow it with your camera while pressing your shutter release button.  Your subject will remain fairly in focus, and the objects around your subject will be recorded as either vertical or horizontal streaks. NOTE: to pan effectively, you want a shutter speed of at least 1/30 sec.

{The above picture of my nephew running through the living room was taken with a shutter speed of 1/5s and an aperture of f/5.6}.


I hope you've enjoyed this photography tip and are excited to give it a try. I challenge you to experiment with your shutter speed next time you photograph an object in motion.

If you have any additional information to add regarding shutter speed and its effects, please fell free to comment. What tips have you found effective when adjusting your shutter speed to different settings?

Also note that anyone should now be able to comment as I have changed the comment settings :)

Thursday, January 20, 2011

Photography Tip #2: Rule of Thirds

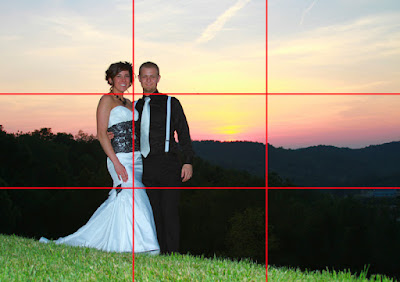
It's important to consider composition when taking a photograph, and one of the ways to do this is by determining where you plan to position your subject(s). An ideal way to make your photo more interesting or appealing to the eye is to utilize the "Rule of Thirds." The Rule of Thirds is a guideline that will help you create balanced, off-center photographs.

As you look through your viewfinder, imagine there are lines dividing your image into thirds, both vertically and horizontally, thus dividing your image into nine equal parts (as shown in the above image). If you place important picture elements on these lines (or preferably on their intersection points) rather than in the middle of your image, you will end up with a more balanced and visually appealing design.

This rule works well for both vertical and horizontal pictures since the sections are equal in size.

Note, however, that while placing your subject(s) off-center has its visual advantages, there are certain situations when you will want to center the important details (or your subjects) within a photograph. Experiment with the Rule of Thirds next time you are taking photos, and see how utilizing this technique can add dimension and interest to your image.

Please feel free to comment on examples in which utilizing the rule of thirds worked well for you or didn't add a significant amount of visual stimulation within your picture. Also feel free to add any additional information that may contribute to utilizing this technique when photographing.


Wednesday, January 19, 2011

Photography Tip #1: Lighting and the Outdoors

I've decided that throughout the course of my blogging I plan to share tips and tricks for basic ways to improve how you capture your photography. This is for anyone who enjoys taking photos, anyone who may think of themselves as an amateur photographer, or anyone seeking photography professionally. I've decided not to go in any particular order or plan to post these at any given time. As you all know by now, I'm expecting a baby with the next couple of weeks (or sooner), so I'll just plan on providing these tips as time allows. ENJOY!


Photography Tip #1: Lighting and the Outdoors

Use your flash to balance a bright light. This concept may seem counterintuitive, but it will bring details out of the shadows thus keeping the subject properly exposed. In other words, turn your flash ON on sunny days.

If your subject is back-lit by bright sunlight and is slightly shadowed, using your flash will equal out the light in front of your subject with the light that is behind.

In addition, you can lighten harsh face shadows by using the camera's flash if the sun is overhead.

If you choose to do a photo shoot outdoors amidst the mid-day sun, you may want to consider the following to reduce the negative effects caused by harsh sunlight:

1. Place your subject(s) in a shaded area. Under or around trees or buildings are ideal locations for finding refuge from the mid-day sun.
2. If a shaded area isn't available, consider using a scrim to diffuse the effects of the harsh sun. This will provide a nice "soft-box" effect for your subject(s), keeping them properly exposed.
3. Take advantage of overcast or clouding days. Clouds provide natural "soft boxes" by diffusing sunlight for perfect lighting conditions.
4. Be sure to know your camera's flash range. The maximum flash range for most camera's is 5 to 10 feet. Pictures taken beyond that range will be underexposed (too dark).


While I love everyone in this picture (It's my family on my Husband's side), this photograph displays several basic outdoor lighting mistakes. Many of the subjects in the back row are looking directly into the sun, causing them to squint, overexposing their faces, and creating harsh shadows under their eyes, necks, and noses. On the other hand, the subjects in the first two rows are shaded, thus properly exposing their faces and reducing the negative effects of the harsh sun. This would have been a much better photo had everyone been properly and equally shaded.

I hope this basic tip has been helpful and is simple for you to understand and apply. Good luck experimenting with the suggestions listed above the next time you adventure outdoors with your camera. Happy Photographing!


Tuesday, January 18, 2011

ICE CREAM - Can I blame it on the pregnancy?!!

I've noticed myself craving certain things during this pregnancy. I've mostly had a desire for Chinese food (particularly lo mein) or dairy products, like yogurt and milk (YUM - I LOVE milk!), and certain other foods. But none, I say NONE, compare to the cravings I have had for ICE CREAM! And not just any ice cream, mind you. It has to be Ben & Jerry's Mint Chocolate Cookie Ice Cream.


I've literally eaten this ice cream almost every evening for the past 8 months! Now before you begin thinking that I'm a sweetaholic and will be 200 lbs in no time, let me defend myself a little bit first. I only eat about 1/2 cup or so each time, which is just enough to satisfy my desire. This pint size beauty generally lasts me 3-4 nights.

Why only this flavor, you ask! I wish I knew. I've tried sooo many other flavors, particularly because this certain flavor is only available at one grocery in town (trust me, we've checked!), so when we're shopping somewhere else, I have only one option... to get a different flavor. All others, though, have generally left me feeling unsatisfied. I almost wished I hadn't eaten them at all. I mean, what's the point of eating something high in calories, if you don't throughly enjoy it, right?!

I'm just wondering if I'll continue to "need" this dish of sweet perfection after Miss Audrey makes her debut.

At first, I wasn't sure if wanting the ice cream on a daily basis really was a pregnancy related craving or just the need for something sweet. So, I began researching pregnancy and food cravings. I've always thought cravings during pregnancy existed, but was that because so many movies I've seen or TV sitcoms instilled that thought in my brain? Well, during my researching, I actually discovered some interesting information on this topic. Food cravings during pregnancy is very real, and apparently there are several possible reasons for it.

Evidently, most women experience food cravings at some point during their pregnancy. Generally it's the sweet or salty foods, spicy or fatty foods, some type of cuisine, or a certain unusual food that is the culprit. I suppose, in my case, it's mostly sweet.

The most obvious reason for food cravings is that my body is working 24 hours a day, 7 days a week to grow a healthy baby, so the cravings could be a result of my body's need for additional calories. Another reason for food cravings during pregnancy is that they may be the result of certain nutritional deficiencies. My body knows what it's lacking and what I need to give it for extra supply. Pretty neat concept. Like iron, for example. If I'm craving meat at a certain point in my pregnancy, it could be my body's way of telling me, "Hey, I'm running low on iron here. Fill me up!"

So, perhaps, I've been craving ice cream every evening for the past 8 months because my body is trying to tell me that I need that additional calcium. Or, maybe I'm just trying to find a good excuse to eat something I find irresistibly delicious ;) We may never know!

If you've been pregnant or are pregnant, what, if any, cravings have you experienced or are experiencing?! Have you ever wondered why you were desiring those certain foods? Too bad I couldn't crave something a little healthier for me... at least it is a good source of calcium though ;) I mean, I could have craved potato chips or candy bars... then I really would be taking in lots of empty calories!


Monday, January 17, 2011

A Glimpse of something Wonderful

I realize that I haven't shown any ultrasound pictures of Audrey yet, and being that I'm fairly certain that I've had all the ultrasounds that I'm going to have during this pregnancy, now's a good time to show all of them off together (well, some of them anyway... we have over 12 pictures of her!).

Before I begin with the pictures, I'll give you a little background on this pregnancy versus my first pregnancy with Ava. Up until about 32 weeks into my first pregnancy, everything was going beautifully. My blood pressure was great. My weight was on track. All of the other important factors the physicians consider during pregnancy were right on cue. Plus, I wasn't having much, if any, symptoms of morning sickness or nausea. I was, in fact, enjoying being pregnant. Then around week 32, while I was at one of my normal weekly prenatal check-ups, the nurse took a high blood pressure reading. I can't remember specifically what it was, but I do remember my diastolic being in the high 80s. They decided to take it again after several minutes to make sure it wasn't a fluke reading. Turns out, it was still high. This was concerning to the doctor. Therefore, he ordered an ultrasound, which revealed a low AFI (amniotic fluid index), which is known as oligohydramnios. From that point on, I was seen twice a week by the high risk physicians, had a least 1 non-stress test per week, and had several ultrasounds during the course of the last few weeks to monitor the AFI.

Each week the fluid seemed to continue to decrease. They recommended I drink more water and get more rest. Even though I was drinking water non-stop (I love water, by the way), I truly tried to drink more and more. I tried to get as much rest as I could, but that was difficult. I was working 40+ hours a week as a speech pathologist in a long-term care nursing facility, which involved a lot of walking and standing and just plain being busy. Don't get me wrong, it's nice to be busy when you're at work and have lots to do, but when you're pregnant, you're not quite as excited about it. So, every evening when I got home, I would feel like a zombie. I think my bed-time was around 8:30-9pm. Some nights even earlier.

The doctors called my "condition" idiopathic, meaning they couldn't find a cause for it. The placenta was functioning perfectly and in the correct position, and there was no evidence of leaking fluid. Plus, Ava always had a full bladder, which indicated that she was urinating and ingesting the fluid properly.

The physician was hopeful to have me wait out my pregnancy until the 37 week mark, but because my AFI was lowering into a critical level by my mid-36 week check-up, they decided to admit me into a room at that moment. I should also mention here that I was then scheduled for a caesarean, rather than being induced, because Ava was frank breach. We think that she was unable to turn into the head down position because of the lack of amniotic fluid. So, at 9:48pm on July 2, 2009, our precious first daughter came into the world, and we were more than happy to see her! That was a moment in our lives that will always be remembered as one of the most blessed and cherished moments. We love her so very much!

Okay, back to the comparison of the pregnancies..... this pregnancy has been such a breeze. I haven't had any complications (knock on wood!!) and all my sats look great. My AFI is perfect. My blood pressure is good. All is well. And... Audrey is already in the head down position. I really think that being able to stay at home with Ava, and not working 40 hours a week (although I do work as a photographer and per diem as an SLP, and don't get me wrong, being a stay-at-home mom in itself is work!) has contributed to my wonderful levels of amniotic fluid. I've been able to get more rest and drink plenty of water.

Also note that I'm planning to have a VBAC (vaginal birth after caesarean) this time. I was very much mentally prepared to have a vaginal delivery while pregnant with Ava after having read multiple books and watching several videos on the subject. Having read even more books and watched even more videos, I am just as mentally prepared, if not more so, to have a vaginal birth this go around. I think it will allow for a faster, easier recovery and will allow us to have more children in the future.

So, for those of you who haven't fallen asleep because I have made this blog into a book, let's take a look at Audrey, our precious little girl!


7 weeks (the pic says 9 wks, but the ultrasound revealed she is actually only 7)


19 weeks, 5 days


19 weeks, 5 days


36 weeks


36 weeks


In less than 4 weeks (plus or minus), we'll be so very blessed to meet our second precious little daughter for the first time. We can't wait to welcome her into the world and into our lives!


Sunday, January 16, 2011

We're ready when you are little girl!

We've finally finished the babies room, and not a moment too soon being that I'm almost 37 weeks pregant! The crib that my sisters and parents got us for Christmas is put together and already made with fresh, clean sheets. I'm not sure if Ava understands why there is a second crib in her room, but she often asks to get in it. I guess she's trying to break it in for her little sister :)

Not only is our little one's crib up and ready, but I finished crafting the letters of her name that are now placed on the wall above her crib. I purchased these letters (unpainted and undecorated) on ebay; the seller's information and store is available at: bens-n-baileys_closest. I followed the same technique to decorate the letters as I did for Ava's letters in one of my recent blogs, Ava's Letters get a Make-Over, and I had a lot of fun doing it! (The only thing I did differently this time was to glue ribbon to the top, back of each letter in order to hang it on the wall). I definitely recommend decorating wooden letters or just crafting in general. It's a lot of fun and so beautiful to look at when completed.

So (for those of you who don't already know) you'll finally be able to see what we plan on naming our second, precious daughter.

Now for the big reveal.........


Here's each letter individually for a better look at the detail.


Here's a pic of Ava's letters (for those of you who may not have seen them).


And here are some pics of the room. (P.S. - The curtains are semi-homemade. Knowing they were way too long when we purchased them at Target, I decided to get them anyway and was able to make several homemade modifications. I trimmed them down to the right length and used my sewing machine to stitch the seam. I then used the remaining material to make the fluffy ruffle for the top. Even though it's difficult to see them in the pic below, they're pretty cute, don't ya think?!)

I think Audrey's going to enjoy her "new" room, and I sure hope Ava enjoys sharing it!! I also hope you've enjoyed looking at the pics and are now possibly inspired to start doing some crafting of your own!

Thursday, January 13, 2011

Look Who's Talking

A little spill about child language and development -

As a mother and a speech-language pathologist, I know just how important it is to focus on and encourage your child's language development. Because Ava is 18 months, I'll discuss the significant milestones of this age category as well as ways to promote further development. And being that I am a very proud mother, I'll also brag a little bit about my daughter's language capabilities and ways we, as parents, have been able to encourage and praise her :)

First of all, language is categorized into 2 main subunits: receptive language and expressive language. Receptive language is defined as the comprehension of oral, written, or symbolic language (ability to understand). Expressive language is defined as the transmission of oral, written, or symbolic language (ability to express). This will make more sense as we go along.

A typical 18 month old is able to generally exhibit the following language milestones:
[expressive]
* has vocabulary of 5-20 words
* vocabulary is primary composed of nouns
* some echolalia (continuous repeating of a word or phrase)
* much jargon (words that are unintelligible) with emotional content
[receptive]
* is able to follow simple commands

Keep in mind that this is a "typical" 18 month old. Many children this age may only be displaying a couple of these characteristics, and many are displaying much more. It's important to understand all the aspects of language when looking at your child, rather than focusing on just one. For example, perhaps your child can only say a few words. This would be his/her verbal expression. But this same child has the capability of making known his/her wants/needs through gestures or even signs. Language shouldn't be thought of solely as verbal or spoken language. In fact, when Ava was much younger, before she was able to speak, I decided to implement some signs into her language. She was and is still able to sign "more," "milk," and "done." It's amazing how the human brain can quickly learn something new and begin to apply it.

If your child, however, isn't displaying any of the characteristics listed above and you notice that not only is verbal expression lacking but comprehension and even social behavior are concerning, it would be strongly recommended to discuss your child's development with a physician, who in turn, may refer you to a speech therapist for further evaluation.

Enough lecturing (for now) and on to some bragging!

Ava is currently able to:
* verbally express 50-60 words as well as sign several words
* verbally express 3-4 word phrases (ex. "mommy, i see you" and "don't want more")
* repeat words that are heard for the first time (we really have to be careful what we say!)
* follow simple 1-2 even 3 step commands (ex. go get your book and your baby, then put it in the box)
* recognize and verbally express several colors
* recognize and verbally express many body parts
* comprehend and verbally express many prepositions and actions (ex. up, on, in, over, down, pull, push, etc)

Sometimes I think our little one is a genius! or perhaps she has been able to develop so rapidly, in part, to how we have encouraged her along the way. I very strongly encourage parents to read to their children, and to not only read, but to ask questions or even discuss pictures along the way. Almost every time Ava and I read a book together, she'll point out something in the book that she learned from a time that we previously read it.... an animal, a color, the sound an animal makes, etc. She loves to learn, as do other children, and she loves to be challenged. She also loves to hear about it. Tell her how well she's doing. Say things like "good job" or "wow, you're so smart." Even if your little one doesn't understand what "smart" means, she'll see the expression in your face when you say it, and she'll be delighted in how you say it. Children know when they're being praised, so be sure to praise your little one as often as you can! Also, make your next story time fun, adventurous, and challenging for your youngster. Let reading be a new discovery every time you and your child open a book together!


Here are several of Ava's favorite books, as well as books I would recommend reading to your child. Starting from the top left: textured and touch-&-feel books, Sesame Street books (these generally include books about numbers, shapes, letters, following directions, etc), Biscuit books, and lastly, window and lift-the-flap books.


Ava loves to "read." She also loves to give "tissies" (as she calls them) as shown in the second top picture.

Another way we have encouraged Ava to excel with her language is through implementation of music. Singing. Dancing. It's not only fun, but it advocates learning! I just love when Ava comes over to sit on my lap, looks me in the face, and says "sing mommy." Melts my heart every time! Language, like music, has a rhythm (our speech has a beat and a tempo). Therefore, there's no surprise that language learning is enhanced when children experience the rhythm of music. So, sing with your child as often as you can. Trust me, your little one won't care if your not American Idol worthy!

I hope I haven't lectured too much, and I also hope that you are now motivated to challenge and encourage your young one through many new discoveries and possibilities that are available to you... even the ones inside your own home!

Wednesday, January 12, 2011

It's SNOWING.... Let's Eat SOUP!

It's been snowing at our house all day. In fact, it's been snowing non-stop for 2 whole days! So, I decided what better way to keep our tummies warm and satisfied than a nice, big bowl of smoked sausage and potato soup!
Caution: Your mouth may water by the time you finish reading this!!

Ingredients include:
5 potatoes
1 (10 1/2 ounce) can cream of mushroom soup
2 (10 1/2 ounce) cans chicken broth
1 lb smoked sausage
1 medium onion
1 cup milk
1 cup shredded cheddar cheese
1 tbsp. cornstarch
1-2 tbsp. olive oil
salt and pepper (to taste)


Directions:

1. Pour chicken broth in crock pot.
2. Add can of mushroom soup and mix well with broth.
3. Peel and dice potatoes, add to crock pot.
4. Dice onion and saute in skillet with olive oil until soft.
5. Slice smoked sausage and then quarter.
6. Add to onion.
7. Cook until smoked sausage is hot.
8. Add to crock pot.
9. Cook on high for 4 hours.
10. Before serving, lower heat and add milk and cheese. Stir in cheese until melted.
11. Mix cornstarch with a small amount of water. Mix until smooth. Add to soup to help thicken.

(Add a little shredded cheese on top to garnish.)


Then let your belly do the talking... saying "Thank you" that is! Enjoy this warm and hearty dish with a slice of warm, buttered corn bread.
It's snowing outside, but who cares because we're
warm and comfortably fed in here :)

Tuesday, January 11, 2011

Sticky Finger Lickin' Good!

My husband, Jeremiah, and I attend a bible study every Tuesday night (we bring Ava along, so I guess she "attends" too!), and at every bible study we each bring a dish to have a complete meal. For example, last week we had roasted chicken and veggies, with fresh bread, apple sauce, a salad, and fruit. This week we are having breakfast for dinner. YUM! My husband and I are planning to bring monkey bread. Double YUM! So, I thought I'd share with you how I make monkey bread. It's my mom's recipe, but I'm sure you'll want to add it to your recipe book after you see how easy it is and how delicious it looks!!


You'll first need to gather your ingredients, which include:
* 4 cans of refrigerated biscuits
* 1/2 cup of sugar
* 3 tbsp. cinnamon
* 1 stick butter (melted)


Next, cut the biscuits into fourths.


Combine sugar and cinnamon. Roll each fourth of biscuit in sugar mixture.


Drop sugared biscuit into greased bundt pan.


Pour melted butter and remaining sugar mixture on top of sugared biscuits.
Bake for 30 minutes at 350 degrees. Remove from bundt pan immediately.


Allow to cool and ENJOY!

I guess we'll find out tonight how yummy this sticky, sugary dessert really is!


The portion below was written following the bible study:
I thought the monkey bread was very tasty yet a little dry. Therefore, today I decided to make a glaze to drizzle over the top, which consisted of honey, melted butter, and brown sugar (measurements to taste). This was just what was needed! Very delicious! If you plan on making this recipe, Happy Baking :)

Thursday, January 6, 2011

Ava's letters get a Make-Over

Lately, little by little, we've been getting everything ready and organized for our baby-on-the-way to move in with us, specifically, move in with Ava. In doing so, I decided to get in touch with my crafty side and decorate letters that spell her name to hang on the wall above her crib. I had planned on purchasing the letters from Michaels, but each time I went to pick them up, they were always out of the same letter. Therefore, I decided to purchase her letters on ebay. Being that I'm still waiting on her letters to arrive, I decided that in the meantime, I would add a little zest to Ava's letters... actually a lot of zest... so that she wouldn't feel left out. Her letters were in desperate need of a little attention considering the fact that all I did to them originally was paint them pink. So this blog shows step by step how I gave Ava's letters a make-over.


First, I painted the letters the desired color.
(I had already painted these letters a pale pink when Miss Ava joined our little family over a year and a half ago.)


Next, I traced the letters onto the desired card stock and cut out. (Note: it's best to cut a little inside the line so that the card stock doesn't hang over the edge of the wood.)


Then I traced part of the letter onto a second card stock and cut it out.


I then used Mod Podge to cover the back of the paper letter with a thin layer of adhesive. Then, I applied the paper to the wooden letter and smoothed it out. (Note: you can alternatively use a craft glue if you don't have Mod Podge.)


Next, I applied Mod Podge to cover the back of the second, coordinating paper with a thin layer of adhesive, applied it to the wood, and smoothed it out. I then applied Mod Podge to the face of the letter. It's important to note that you should let it dry completely before applying your embellishments.
(Note: Mod Podge dries clear.)


While the Mod Podge was drying on the wooden letters, I decided to make some pretty flowers out of card stock. (I drew these free hand, but you should be able to find a flower template online if necessary.) Because I choose a solid color for the larger flowers, I decided to spice them up a little bit with glue and glitter. After applying Elmer's paper craft glue gel to the face of the flower, I used a sponge to spread the glue evenly. Then I sprinkled glitter on the glue and let dry. Once dry, I curled the pedals of the flower toward the center for a more realistic look.


Using a hot glue gun, I then glued the flowers together.


Lastly, I glued ribbon and the handmade flowers to the letters with a hot glue gun for the completed product. I'd say that's quite a make-over, wouldn't you?!! These letters will look so beautiful hanging above Ava's crib.

I'm excited for the other letters to get here so that I can continue crafting. And stay tuned, because soon you'll find out what we plan on naming our precious second daughter when I finish decorating her letters for the babies room :)
Related Posts Plugin for WordPress, Blogger...